Configuring Your Agent
The configuration screen is where you shape how your agent sounds, what it says, and how it behaves. You reach it by selecting an agent on the Agents page, or automatically at the end of the create wizard.
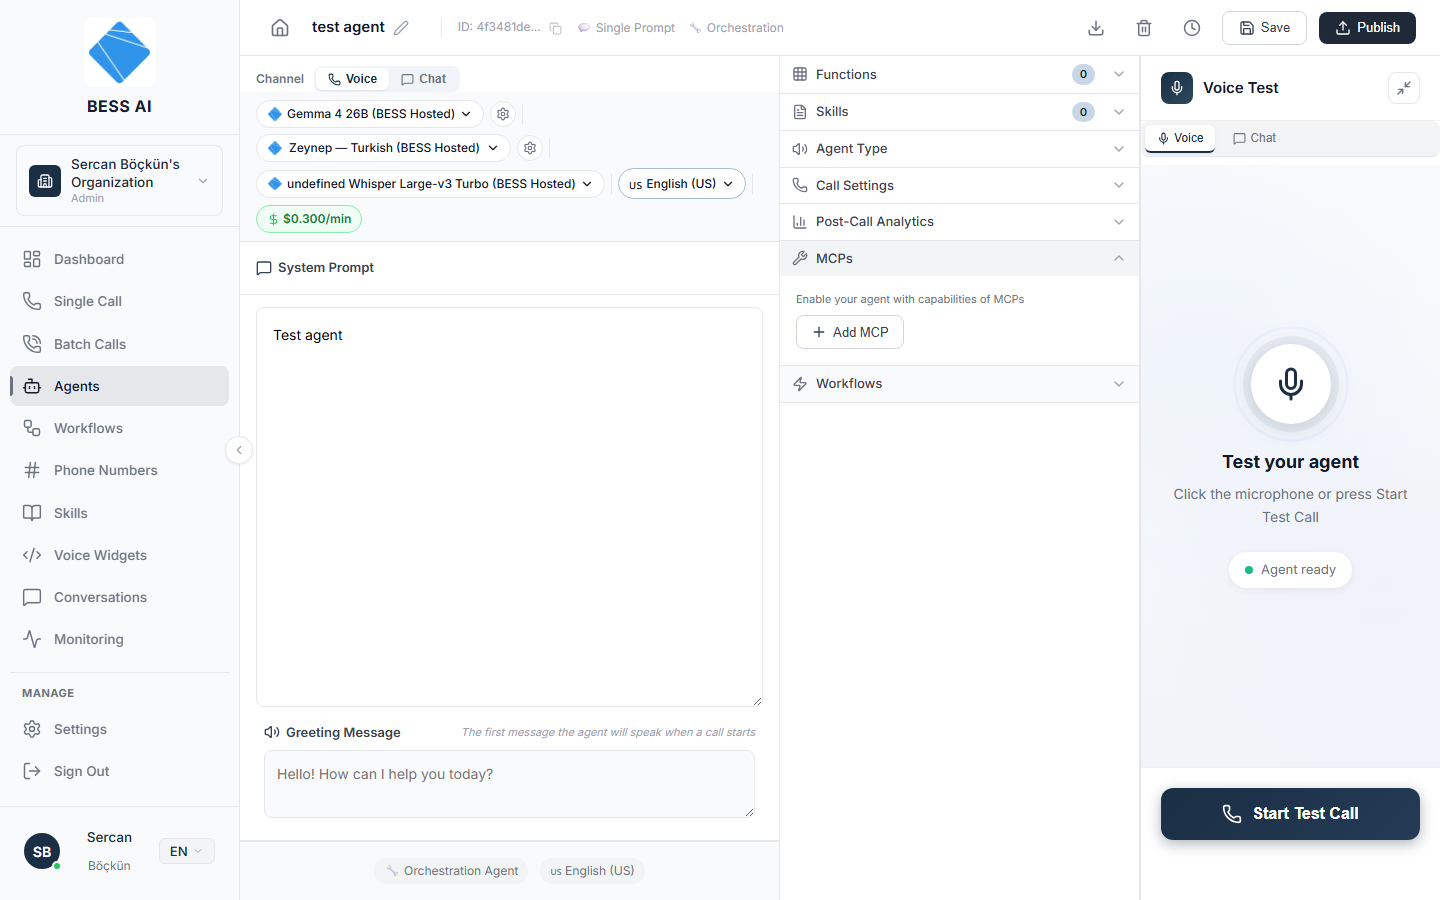
The top bar
Across the top of the screen you will find:
- The agent's name — click it to edit.
- The agent's ID, with a copy button next to it.
- A mode badge — Conversation Flow or Single Prompt.
- A type badge — Realtime or Orchestration.
- Icons for Export as JSON, Delete Agent, and Version History.
- The Save and Publish buttons.
Save only stores a draft. Your agent cannot take calls, be assigned to a phone number, or power a widget until you click Publish. See Testing & Publishing.
Channel: Voice or Chat
At the top of the left panel, the Channel toggle switches the agent between Voice and Chat.
If you switch a Conversation Flow agent to Chat, the platform warns you that the flow will not apply — chat conversations always run from the single prompt.
Model, voice, and language badges
A row of clickable badges shows the agent's core setup. Click a badge to change that setting:
- LLM Model — the AI model that composes the agent's answers. Clicking it also opens LLM Settings for fine-tuning.
- Voice — the voice your customers hear. Clicking it opens Voice Settings.
- Speech-to-Text — the engine that transcribes what your caller says.
- Language — the language the agent listens and speaks in.
- A cost-per-minute badge shows the price of the current combination. For chat agents, per-reply pricing badges appear instead.
System Prompt
The System Prompt is your agent's job description: who it is, what it should do, what it must never do, and how it should speak. Write it in plain language, as if briefing a new employee. This is the single most important field on the page.
Greeting Message
The Greeting Message is described in the interface as "The first message the agent will speak when a call starts". Keep it short and natural — one or two sentences that identify the company and invite the caller to speak.
Dynamic Variables
Dynamic Variables are placeholders that get filled in for each individual call — for example, the customer's name or an amount due. Define them here, then reference them in your prompts and greeting so every conversation is personalized.
Agent Type
For voice agents, the Agent Type accordion offers two options:
- Orchestration — the standard step-by-step voice pipeline. This is also the only type that supports chat testing and chat deployment.
- Realtime — a single speech-to-speech model handles the whole conversation.
Call Settings
The Call Settings accordion appears for voice agents only. It controls the rhythm and limits of the conversation.
Start with the Response Style presets — Quick, Balanced, or Patient — which adjust the timing settings for you in one click.
For orchestration agents, you can then fine-tune:
- Endpointing — how long the agent waits to be sure the caller has finished speaking.
- Responsiveness — how eagerly the agent jumps in with its reply.
- Interruption Sensitivity — how easily the caller can talk over the agent.
- Noise Cancellation — reduces background noise on the call.
For realtime agents, the tuning options are Temperature, Allow Interruptions, and Response Timing.
All voice agents also get these safety limits:
- End After Silence — hang up automatically after a long silence.
- Max Call Duration — the hard cap on call length.
- Reminder After and Max Reminders — how often the agent nudges a quiet caller, and how many times, before giving up.
Not sure what you changed? Click Reset to Defaults to put every Call Setting back to its starting value.
Post-Call Analytics
The Post-Call Analytics accordion controls what happens after each conversation ends:
- Pick the Analytics Provider and Model that will review the conversation.
- Optionally add a custom prompt to tell it what to look for.
- Toggle Enable Sentiment Analysis to score the customer's mood.
- Toggle Enable Call Summary to get a short written recap of every call.
When you are done configuring, click Save to keep your draft — and Publish when you want the changes live.